Clue #2 - It's Border Time!
But first - time to make some decisions...like, what size do YOU want your FINISHED Sweet Freedom Mystery quilt to be? What are YOUR Standards Of Excellence?
We are so fortunate to have SEVERAL groups participating in our Sweet Freedom Mystery, and each group represented has their own Standards Of Excellence and their FINISHED quilt requirements.
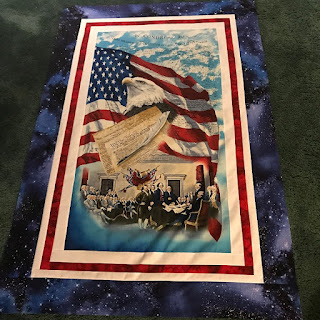 |
| January 2022 Sweet Freedom Mystery 'partial reveal' w/first borders - We Still Have Stars to Add Plus...a few more Surprises! |
My January 2022 Sweet Freedom Mystery quilt top FINISHES at 55" x 70" AFTER I modified the original quilt panel to 23" x 40". Without mods, 'my' quilt top would FINISH in-the-raw - PRIOR TO being quilted/bound/labeled, at 56" x 74 1/2".
There is also an 'optional' final perimeter border AFTER our Stars have been added - Quilter's Choice. Those pics will be released in the Final Reveal on Friday, January 28, 2022.
As mentioned previously, prior to adding ANY borders, the patriotic panel YOU chose to work with will need to be 'trimmed to size':
 |
| Trimming/squaring up the Top |
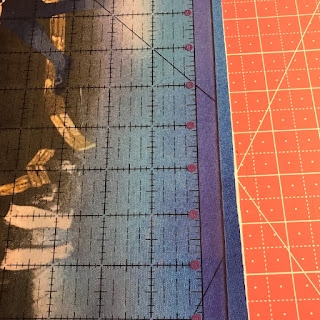 |
| Trimming/square up the Panel bottom |
Once the Top & Bottom of the panel have been trimmed/squared, move to the sides - keeping YOUR finished panel measurements in mind. Once ALL your panel prep is complete - including proper pressing to get ANY remaining wrinkles removed, time to move on to adding the borders.
Here again - YOU get to determine what YOUR border sizes need to be. I chose 1" FINISHED white/RED/white borders for 'my' 2022 January Sweet Freedom Mystery, based on 'my' finished quilt measurements. You may choose whatever size suits your personal preferences and needs, again - Quilter's Choice!
 |
| Attaching the RED Top Border |
Notice, I chose to attach BOTH my 'side' borders First! Most Do Not do this - Quilter's Choice! Therefore, I don't normally provide side border 'length' measurements because 'my' measurements are based on attaching those side borders First, which confuses most quilters, and skews the final border length measurements for 'them' and their personal choice method of attaching borders.
To determine your border measurements, measure across the Top/Middle/Bottom of your COMPLETELY Prepped = Pressed/Trimmed/Squared quilt panel, average those measurements and cut the appropriate length. Example: IF the Top measurement = 24", the Middle = 24 1/4", the Bottom = 23 3/4", Add ALL three (3) measurements together = 72"/3 = 24" is your 'average' from ALL three (3) measurements and what you would cut the length of your Top & Bottom first borders for your panel.
Do the same for each side border, taking the average measurement of right side/middle/left side TOTAL panel measurements w/borders. Take new measurements 'after' the addition of each Perimeter Border.
As mentioned earlier, I add each side border to my panels First - once they are pressed - and I press most borders to the 'Dark Side' unless I only have light as a choice. Typically, I choose to press most borders 'away from' the panel and towards the seam allowance of the most recently added border = Quilter's Choice!
Once each side and/or Top/Bottom border have been added/pressed, take measurements and add the Top/Bottom and/or Side borders. Repeat until ALL boarders have been added.
My Borders...so far (Please DO NOT assume these are the only borders we will add to this quilt. Some quick math will reveal...No so Fast ;-)
- White = Two (2) 1 1/2" in-the-raw, (1" FINISHED) panel perimeter borders
- RED = One (1) 1 1/2" in-the-raw, (1" FINISHED) perimeter border 'in between' the two White borders
- Dark or Medium Blue = One (1) 3 1/2" in-the-raw, (3" FINISHED) perimeter border, following the White/RED/White perimeter borders (I chose one of the Blues I used in my Stars - the Dark Blue night sky w/stars = Quilter's Choice!)
- Give EVERYTHING a final press!
- Finish up your Stars IF you haven't already - they WILL BE included next week in our Final Sweet Freedom Mystery Clue/REVEAL!
 |
| GO! Strip Cutting dies for our Borders |
AccuQuilt GO! Dies used to create the 1" & 3" FINISHED/1 1/2" & 3 1/2" respectively in-the-raw panel borders:
- GO! Strip Cutter - 1 1/2" (1" FINISHED) Die #55024
- GO! Strip Cutter - 3 1/2" (3" FINISHED ) Die #55032
- Currently there is a SALE Going on over at AccuQuilt, which includes these and MANY other dies/cutters...check out the www.AccuQuilt.com website for additional details...NOT an Affiliate - just LOVE the speed/accuracy of these GO! dies, leaves MORE time for longarm quilting/machine embroidery, gardening and romping w/grandson & dogs ;-)
Happy Cutting/Sewing,
Sweet Freedom Mystery Facebook Group:
https://www.facebook.com/groups/SweetFreedomMystery/


Comments
Post a Comment